Article Sections:
Click links to jump to sections.
Building Your Project in Asana
Organizing Your Tasks in Asana
Using Tags to Organize Information Across Your Workspace
Project Management Tip In Asana
How to sign up for Asana
Go to Asana.com
Click on the Get Started Button on the top right of the page.
You can complete the sign-up process using your Google account. You can also sign up using your email.
Getting Started on Asana
You can easily create a new task, project, or portfolio from the Home page or invite team members to join Asana. You cannot make a portfolio on the free version. However, you can still collaborate with up to 10 people which is suitable for small teams.
To invite others, click Create and select the invite option from the drop-down menu.
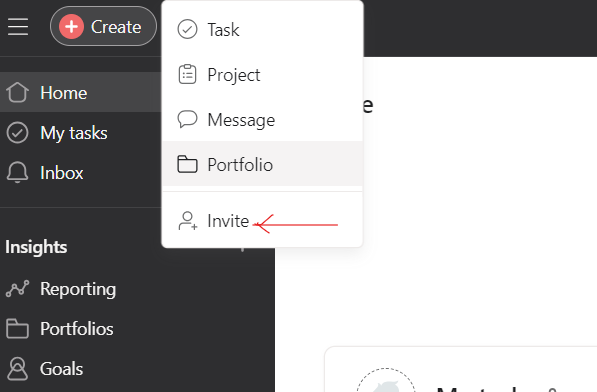
You can then add the emails of the users you want to collaborate with. There’s an option to add them to certain projects. You can remove the suggested projects in the Add to Projects field and click Send to complete.
How to Create a New Project
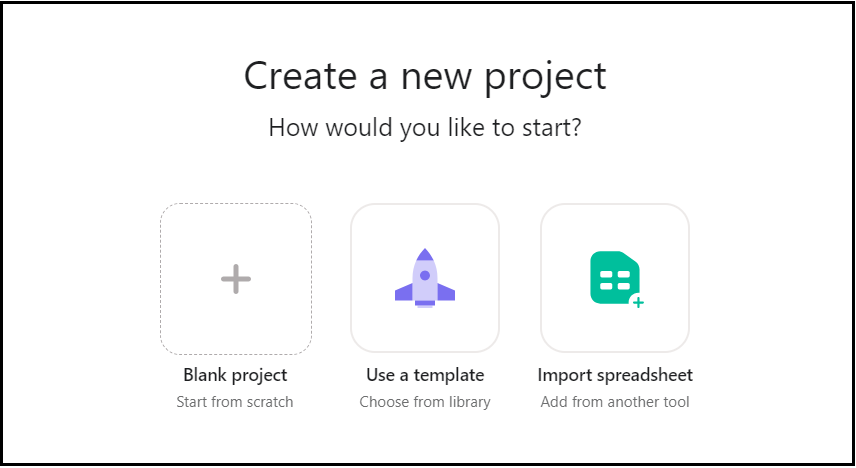
click on Create and select the project option from the drop-down menu. You have three options for creating a new project: Blank project, Use a template and Import a spreadsheet. If you are new to project management tools, I recommend using a Blank Project.
When creating a new project, you can select a default project view from the list view, the board or the calendar view.
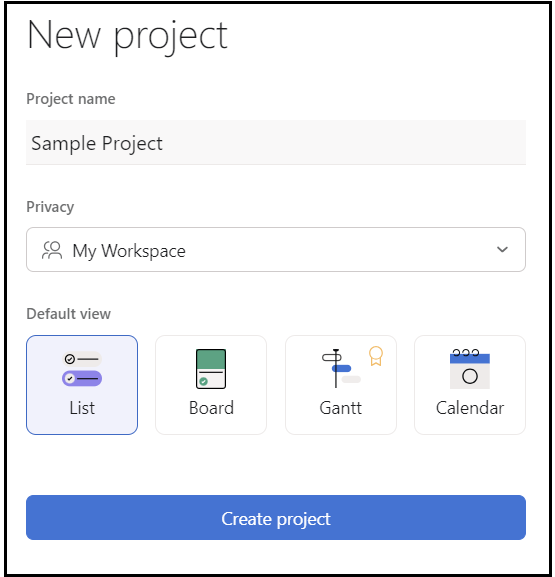
All views are interchangeable from your project dashboard, so you can select one as you create a new project.
- The list view: The project tasks appear as a list separated by the sections you created.
- The board view: The project tasks appear as tiles separated by sections.
- The Calendar view: The project tasks are organized in a calendar based on due dates.
NB: Due dates added to subtasks will not show on the calendar view.
Setting Up A Project on Asana
♥ Expert tip: If you want to get alignment with your team members, please write a project brief first.
What is a Project Brief?
What’s Included In a Project Brief?
Tips for Writing a Good Project Brief?
What is a Project Brief?
A project brief is a short and clear document that describes the objectives, scope, deliverables, timeline, and other essential elements of a project. It provides a shared understanding
What’s Included In a Project Brief?
Project Overview:
A summary of the project, including its purpose and goals.
Objectives:
Specific outcomes of the project. These objectives should be consistent with the overall goals of the organization or client.
Scope:
This section should describe the boundaries and context of the project. It should provide a clear understanding of what is included in the project, as well as what is not included. This helps prevent scope creep and ensures that everyone involved in the project understands its limits.
Deliverables:
List the specific project outputs or results. This could include documents, prototypes software or products.
Timeline:
Define the project timeline including key milestones and deadlines. This will help stakeholders understand the project’s timeline and allow for better planning and resource allocation.
Budget:
Provide information about the project’s overall budget and whether there are any key budgetary constraints.
Roles and Responsibilities.
Define the responsibilities of key team members. This improves clarity on who is responsible for what
Stakeholders:
Identify all stakeholders involved in the project
Risks and Assumptions:
Identify potential risks that could affect the project’s success and any assumptions made during project planning.
Tips for Writing a Good Project Brief
- Be concise: Keep it brief. Use clear and concise language to convey the main points of the project
- Focus on key information: Limit the project brief to essential information to avoid overwhelming stakeholders.
- Involve other stakeholders: Collaborate with other stakeholders when drafting a project brief and ensure their expectations are captured.
- Use a template. Asana provides a Project brief template and a guideline for completing it.
Building Your Project in Asana
♥ Expert tip: You’d need to break a project down before building it in Asana.
Breaking down a project entails systematically analyzing and identifying the work required to achieve the project’s objectives.
The way a project is broken down depends on its nature. In project management, projects are broadly classified into traditional (waterfall) and agile. A hybrid project combines both the waterfall and agile project management approaches.
The waterfall project management follows a sequential process, in which one phase must be completed before starting the next. For example, building a house will follow a traditional project management approach. However, the agile project management approach prioritizes continuous improvement, adaptive planning, and early delivery.
If you are running a traditional project in Asana, then it’s useful to break the project according to deliverables and milestones
List All Your Deliverables
Identify all the project deliverables. These are tangible outcomes of the projects. They can include physical products, key documents or other tangible results.
When itemizing the project deliverables, collaborate with your team members to ensure all the project deliverables are captured.
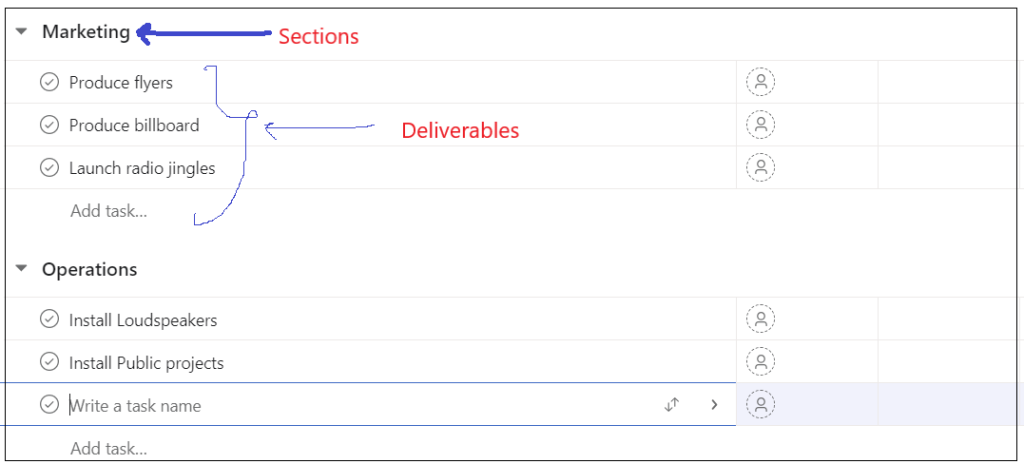
Use sections to organize Deliverables
Asana has a feature called sections that allows you to organize related deliverables and tasks.
Assign Responsibilities to the Deliverables
Although you can assign responsibilities to multiple people, It’s more efficient to assign responsibility to one person who can then reassign tasks to others within the team. Doing this improves accountability and clarity. In other words, it reduces the confusion about who is supposed to deliver what.
Break Deliverables into Tasks and Subtasks
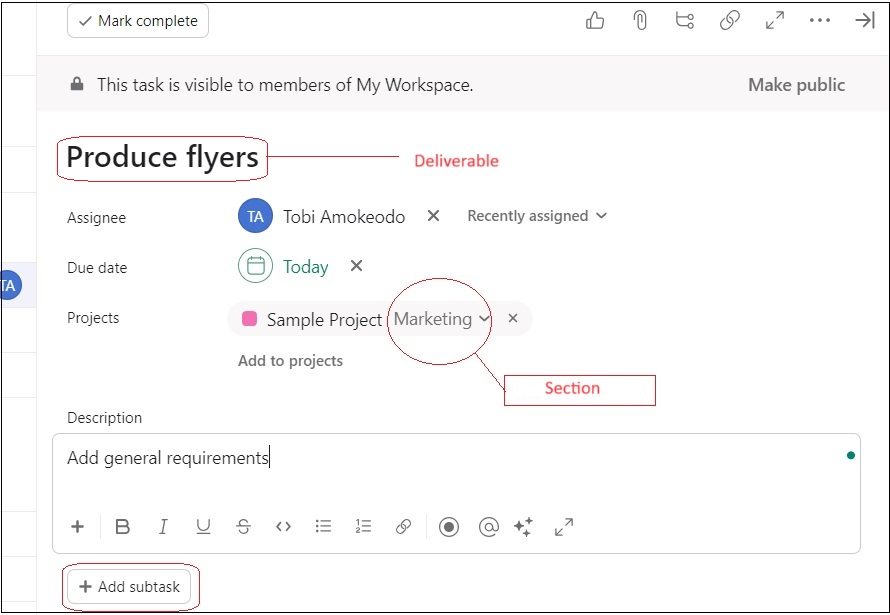
You can break deliverables into tasks and subtasks and assign responsibilities to the other members of your team. You can also assign due dates to subtasks.
NB: Due dates added to subtasks will not show on the calendar view.
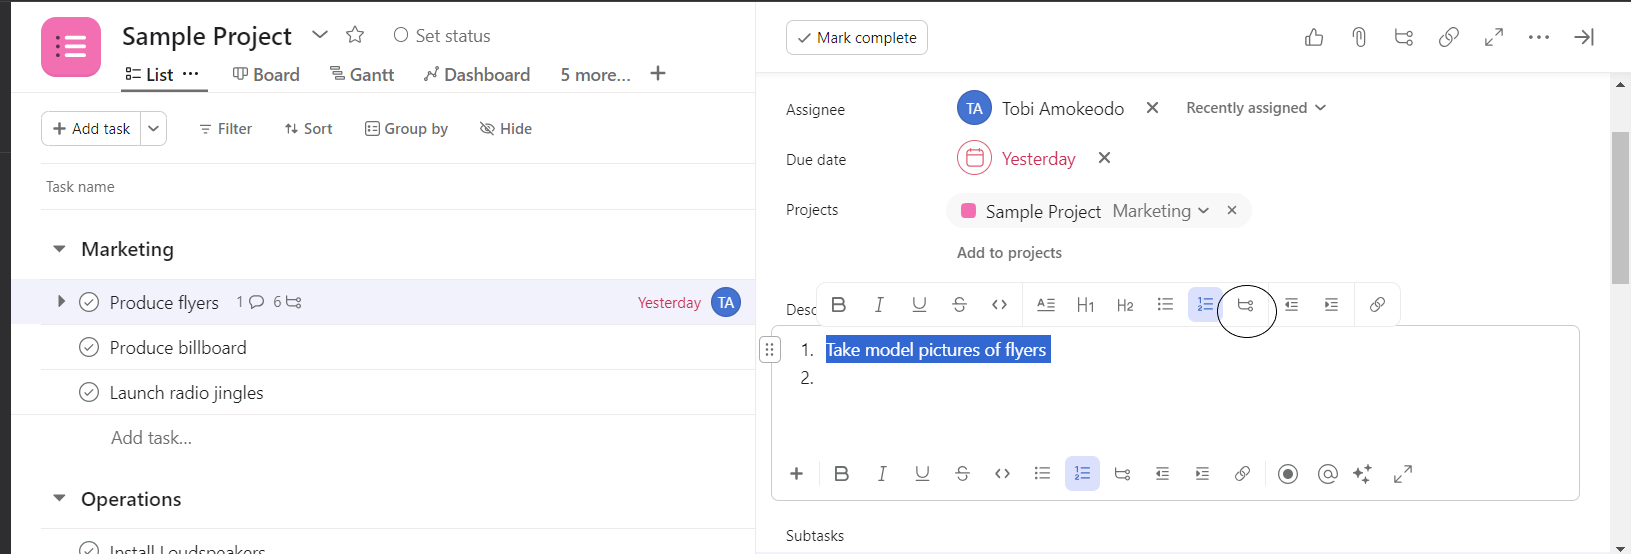
How to Turn Task Descriptions into Subtasks in Asana
You can also turn words or sentences within the task description by highlighting them and clicking on the subtask icon as seen in the image below. You can also use the keyboard shortcut ctrl + shift + Enter.
The created subtasks will appear in the subtasks section below the task description. Clicking on the highlighted words takes you to the subtask.
Organizing Your Tasks in Asana
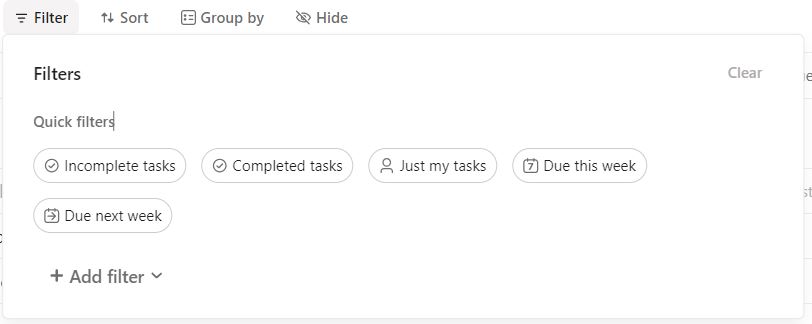
In addition to various views, you can sort, filter, and group project tasks.

You can filter for incomplete tasks, due this week and by who the task is assigned to (by clicking the add filter options as seen in the image below).
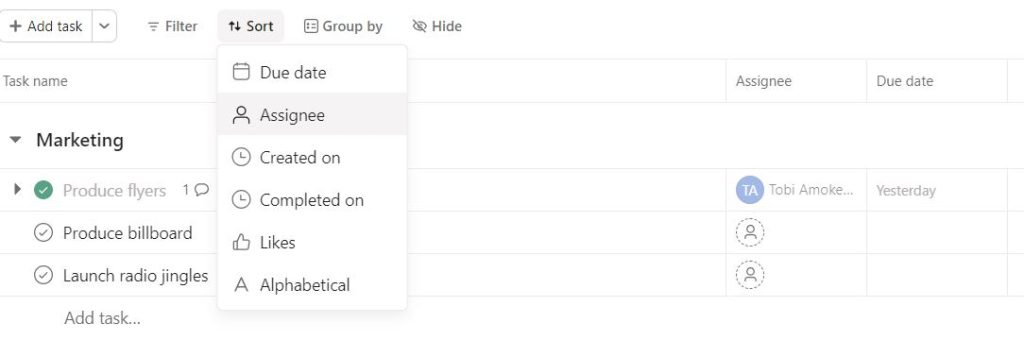
Similarly, you can sort tasks according to their due dates, assignee, and the dates they were created
Using Tags to Organize Information Across Your Workspace
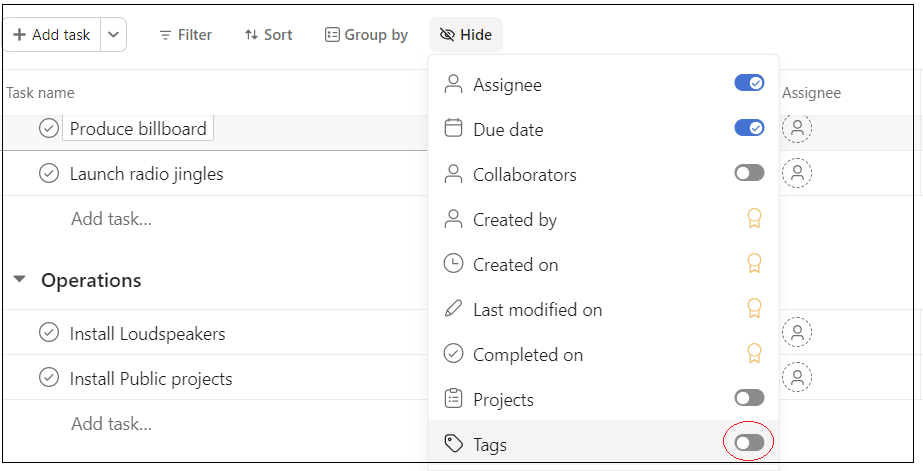 From the list view, click the Hide option and turn on the Tags option from the drop-down menu.
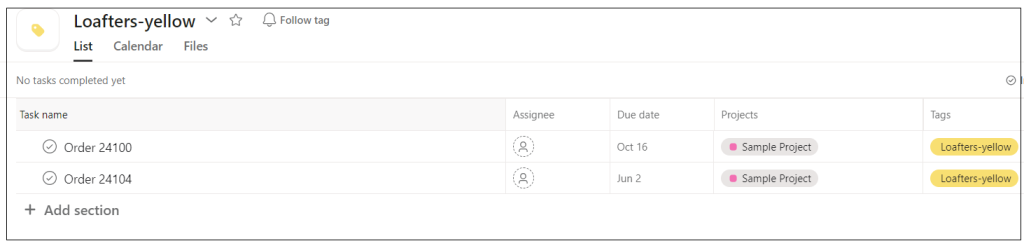
You can use tags to organize information across the organization. For example, your tags can be used to provide more information about your product SKUs, or the type of project. While you cannot group tasks or projects using tags on the free plan, you can view all tasks with the same tag.

A few use cases for Tags in Asana
Priority Tags
Use tags to prioritize tasks based on urgency or importance, such as “High Priority,” “Medium Priority,” and “Low Priority.”
Status tags
Track the status of tasks and projects using tags like “In Progress,” “On Hold,” “Completed,” or “Pending Review.”
Department or Team Tags
You can tag tasks according to the teams involved. For example, you can create tags like “Marketing,” “Sales,” “Operations,” or “Product Development” to categorize work
Location Tags
You can use tags to indicate locations or regions associated with tasks or projects. For example, you could tag a product’s delivery point.
Using Portfolios in Asana
A Portfolio in Asana helps you track multiple projects in one place, giving you a high-level view of progress, deadlines, and overall status. Follow these steps to set up and manage a Portfolio effectively.
Step 1: Navigate to the Portfolios Feature
- Go to the Asana homepage.
- Click on “Portfolios” in the left sidebar.
- Note: Portfolios are available in Asana Business and Enterprise plans.
Step 2: Create a New Portfolio
- Click the “Create Portfolio” button.
- Enter a name that reflects the group of projects (e.g., “Marketing Campaigns” or “Product Development”).
- (Optional) Add a description to clarify the purpose of the Portfolio.
Step 3: Add Projects to Your Portfolio
- Click “Add Work” or “Add Projects”.
- Search for and select the projects you want to track.
- Repeat this for all relevant projects.
Step 4: Customize Portfolio Columns
- By default, columns like Project Name, Status, Due Date, and Progress are visible.
- Click “Customize” to add fields like budget, priority, risk level, or custom metrics.
Step 5: Set Up Status Updates
- Click on any project within the Portfolio to update its status (On Track, At Risk, Off Track).
- Use comments to provide context on progress.
- Enable automatic updates if needed.
Step 6: Use Dashboards & Filters for Insights
- Click the Dashboard tab to see a high-level view of all projects in your Portfolio.
- Apply filters (e.g., by project status or team) to focus on specific insights.
Step 7: Share the Portfolio with Stakeholders
- Click “Share” and invite relevant team members or executives.
- Assign appropriate view or edit permissions based on roles.
Step 8: Monitor & Update Regularly
- Review your Portfolio weekly or bi-weekly to keep project data up to date.
- Adjust priorities, timelines, and resource allocation as needed.
Using Dashboards in Asana
Step-by-Step Guide to Setting Up a Dashboard in Asana
A Dashboard (paid plans) in Asana provides a high-level visual overview of project progress, key metrics, and team workload.
Step 1: Navigate to the Project Dashboard
- Open Asana and go to the project you want to track.
- Click the “Dashboard” tab in the top navigation bar.
Step 2: Add Widgets to the Dashboard
- Click “Add Widget” to include different data visualizations.
- Choose from available widget types, such as:
- Project Progress – Track completed vs. pending tasks.
- Task Count by Status – View tasks in different stages.
- Workload Distribution – Monitor team capacity.
- Overdue Tasks – Identify delayed work.
- Custom Charts – Visualize data in bar, pie, or line charts.
Step 3: Customize the Widgets
- Adjust filters to display specific data (e.g., tasks assigned to certain teams).
- Set the time range (daily, weekly, monthly).
- Drag and drop widgets to arrange them as needed.
Step 4: Save and Share the Dashboard
- Click “Save” to finalize the setup.
- Click “Share” to give access to relevant team members or executives.
Step 5: Monitor and Update Regularly
- Review the dashboard frequently to ensure data accuracy.
- Adjust widgets as project needs evolve.
Project Management In Asana
Some best practices for executing projects using Asana.
A project is not an Ongoing Task
A project has a specific timeframe for completion while recurring activities don’t. That is, they will continue until there is a decision to stop them. So, If you are managing recurring activities or operations in Asana, ensure you break them into tasks or tickets, such that each one is treated as a separate project within the scope of your operations. Since Asana does not have a ticketing system, I recommend using an external ticketing reference to reduce numbering errors.

Centralize Communication in Asana
Ensure that all project-related communication happens in Asana. This will improve collaboration and minimize information gaps during project execution. Have a written communications policy that outlines the official communication tools. This will provide clarity to the team regarding how to use communication tools for work. Also, encourage team members to use comments within tasks for project-related communication. This helps to keep task-related information in one place.
Reduce Information Overload
Adjust Email Notification Settings
Ensure you adjust the email notification settings for critical updates alone. For example, users should not receive email alerts every time someone leaves a comment on an Asana task. Limit email notifications to those involved in projects and tasks, to avoid overwhelming people with unnecessary alerts.